Welcome to the QW2S Trouble Free Triangles Class!
Requirements
48—6” x 6” Scrappy Squares
48—10” x 1 1/2"” Sashing Strips--solid, or reads as a
solid
Border Fabrics--sashing fabric, and a light for the wide fabric.
Tools:
Scissors
Pins
Sewing Machine
6" or larger Square Ruler
Cutting Mat
Rotary Cutter
Iron
Magic Sizing
Step One: Take the 48 6" x 6" squares, and cut corner to corner once, as shown.
Make two equal piles of your triangles. For instance, if you have, in step one, cut a green square and red square, and a yellow square, your two piles would be: pile #1--1 green triangle, 1 red triangle, and 1 yellow triangle. Pile #2--1 green triangle, 1 red triangle, and 1 yellow triangle. Of course, this is repeated for 48 triangles per pile. |
|
Step Two: In this step you will need all the triangles from Pile #1, and all of the 10" x 1 1/2" sashing strips. Fold each sashing strip in half and finger press a fold in the center, all the way across. Fold each triangle in half, and finger press a fold in the center, but just a little fold (like, 1/2" is fine). Now, right sides together, place the sashing strip and the triangle together, at their folds, and place a pin in the fold. The strip ends will extend past the ends of the triangle, and this is ok. Now, place 4 more pins in the unit as shown. Sew with the sashing strip on top and the triangle on the bottom. Repeat for all 48 triangles in pile one. Do not iron yet. |
|
Step Three: Finger press a crease in the 48 triangles from the second pile. Again, a small crease of about 1/2" will do. Pin to the other side of the sashing strips sewn to the first triangles, as before. Match them up randomly, so that you don't sew two triangles of the same color together. Sew carefully across, again with the sashing strip on top and the triangle on the bottom.
|
|
Step Four: CAREFULLY press the units open. It does not matter how you choose to have the back seams pressed. I always press them in one direction, while Bobbi presses them to the outer triangles. Use the Magic Sizing lightly to help you flatten the blocks. Need Help Pressing? Click here.
|
|
Step Five: Now you will need to square all 48 units from Step Four. Find the 6" lines on your ruler. You can mark these with tape if you want, as it can make it easier. Now, place it over the block. Line up center of the sashing line on the 45 degree (corner to corner) line on the ruler, so you know you are cutting the block square. Trim off the excess sashing and other parts (if any) with your rotary cutter. BEFORE you trim, make sure there is at least 6' of finished square under the ruler, so that when you go to cut off the other sashing end, you will end up with a 6" x 6" block. Turn the block around, and repeat for the other sashing end. Make sure you have cut it to measure 6" x 6"! Repeat for all 48 units.
|
|
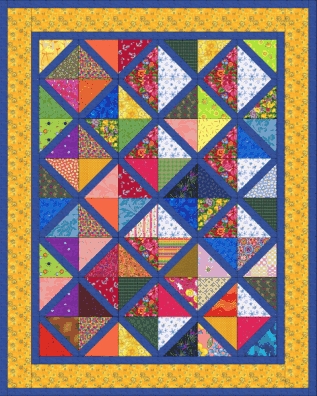
Now it is time for the layout!
Choose a spot on the floor (or a design wall if you are lucky enough to have
space for one) where the blocks can all lay out flat.
They need to be laid 6 blocks across and 8 blocks down. First, just lay them
in any color order, according to the layout plan shown below.
Once the layout plan is set up, check the blocks and rearrange block colors
according to your personal taste.
For instance, if there are a lot of greens, you might swap them out to different
areas so they weren't all together in one spot.
Make sure that the sashing strips go in the directions shown in the rows and
layout below.
Once you have the blocks in the color order you prefer,
pin across the rows. In other words, pin block #1 to block #2, block #2 to block
#3, across.
Make eight rows. Sew together, matching the edges and pinning, as shown.

In a perfect world, all of your seams will match perfectly.
However, in our world, we strive for our best and don't stress on the rest.
It is ok to have a triangle seam not quite meet. In the cutting part, it is
hard to get the line exactly in the middle of the Sashing strip for the best
point.
With practice, this will get easier, though!
Once the rows are sewn, sew the rows together. Pin at each seam junction for a perfect fit. If you need to, ease the seams together for each block.
Click here for the OUTER SASHING Instructions