From the Crowshop
Supplies
(Sunny, bright fabrics)
Skirt 8"x31/2"
Bodice 4" x 8"
Silk Ribbon for bow
1 snap
white glue or Fray Check for side seams (may not need)
scissors
sewing machine
straight pins
needle and thread
iron and ironing mat
Magic Sizing (better than starch!)
hemostat (optional, but really, really handy for turning!)
Pencil
Click Here for the Printable Bodice Pattern for the Sundress.
TIP: Set your sewing machine for as small a stitch as you can manage.
This will help keep the bodice from ripping out when you turn it.
Step One
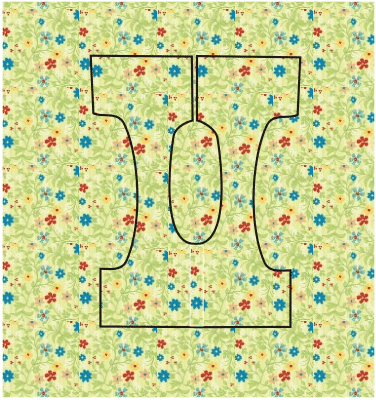
Cut out the pattern piece from the paper, and then
trace it onto the wrong side of your fabric. Do NOT cut out yet.
Make sure to double your fabric, right sides together.
You want a back and front!
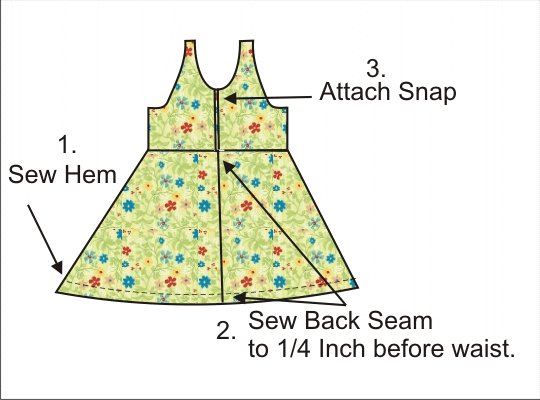
Step Two

Sew up the back, around the neck, and down the other side of the back.
THEN
Sew both armholes. Do NOT sew down the sides, just the circular armholes.
Now cut out your bodice, leaving a small hem.
Carefully turn right-side out. I have found the best way to do this is to use my
hemostat, and reach up from the front through the tube caused by sewing the armhole
and the neck, and grasp the back edge. Gently tug and pull it through.
Once you have it successfully turned right side out, carefully push the corners and so
forth out, and then spray lightly with Magic Sizing. Gently press.
TIP: Never ever 'iron' something so small in a back and forth motion.
Always lift and press down, lift and press down.
This helps avoid stretching and distorting the fabric.
Step Three

Fold the bodice over at the shoulder seams and sew the side seams.
Now, there is a way to sew these so the side seams don't show.
If you 'open' the back and front of the side seams and pin at the underarm seam,
you can sew around very carefully. Then, fold back to original and press.
This is something I occasionally do with sleeveless dresses.
It's also ok to just sew the sides together, treat the seams with dabs
of white glue or Fray Block, and then trim when dry.
Now--this is the trick to a high waist. Trim off all but 3/8" of bodice.
Proceed to Step Four.
For a low waist, simply leave the bodice as is, and proceed to Step Four.
Step Four

Set the bodice aside for now. Set your sewing machine to the largest stitch possible.
Sew along the top row of the skirt piece.
Make a double row as shown above, and make sure to leave threads hanging off
the end to make drawing it together easier.
Return your machine to the smaller stitch you are sewing with.
Step Five

Gather the skirt. Pin to the center of the bodice (right sides facing), then the ends,
and then pin securely across, with as many pins as you need. The more the better.
Make sure as you pin that you have placed your gathers evenly.
When ready, sew the bodice to the skirt. Do this with the gather down and the
bodice under the needle, to help prevent slipping.
TIP: Sew as slowly as possible, checking to make sure you haven't caught the skirt
up into the needle as you sew. You can use a long thin dowel or knitting needle
to help keep the gathers in place.
Step Six
Try the sundress on your Hitty, and decide the length of the skirt.
Trim off for a shorter skirt, and then hem.
Sew up the back seam from the bottom, up to 'about' 1/4" from the waist.
Sew on your snap. You may want to add another snap at the waist. Your call on that!
Make a tiny bow, and sew it to the top of the neck at the front.
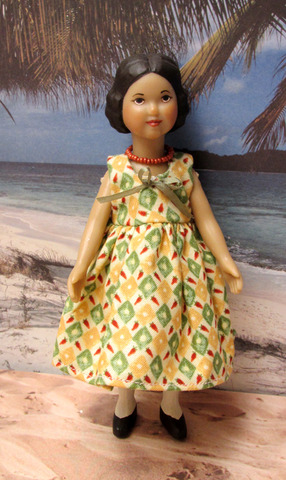
There! All done--and cute as a button. I encourage everyone to embellish this
dress in any way their Hitty prefer! Lace? Decorative buttons? Have fun with this basic sundress!
HOME